
Disclaimer: Devoted Grandma is reader-supported. If you purchase anything through my site, I may receive a small commission (at no cost to you). Thank you.
While there is nothing quite like getting a handwritten letter in the mail, life comes at you fast in today’s society, and email can make things much simpler. Setting up an email account can be intimidating, but it’s easier than you might think. Especially if you use a convenient platform like Gmail!
Consider this your complete guide to Gmail for seniors, from setting up to searching emails to blocking people. By the end, you’ll be a natural at Gmail, impressing all your friends and family.
What Is Gmail?
Gmail is a free web-based email service from Google. The name Gmail stands for Google Mail! It’s become one of the most used email services in the world, and it’s one of the easiest to master.
With Gmail, you get a unique username to use as your email address and lots of storage to save emails and communicate with people. It’s simple, free, and a fantastic way to stay in touch with your loved ones.
Setting Up Gmail
You can set up a new Gmail account in minutes. You can create a new Gmail account on a smartphone, desktop computer, laptop, or tablet.
Follow the steps below to create an account. Often the most challenging part is choosing a username which will be your email that people see. The username is simply what your Gmail account will be registered as, so you want to choose something meaningful.

1. Navigate to the create account page.
This page says “create a Google account” which is the same as creating a Gmail account, so you’re in the right place!
2. Enter the information to create your account. The create an account page asks for this information in the following order:
- First name
- Last name
- Desired username
- Desired password
- New password confirmation
When choosing a username and password, it’s essential to pick something unique but easy to remember.
Gmail allows you to add specific special characters to your username, such as periods (.) and underscores (_). However, this can make it more complicated, so it’s best to keep it simple and use only numbers and letters.
Lowercase and uppercase letters do not matter when making a username, meaning you can use them if it’s easier to type out but Google won’t register the uppercase.
As you enter desired usernames, the form will tell you if the username is unavailable, changing the username field to red and displaying a message saying “username already taken”.
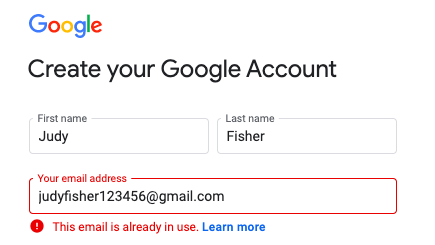

As you can see, seven numbers had to be added to “judyfisher” to make it unique. The more common your name is, the more numbers you will have to add. You can use your full name (judyfisher), or abbreviations for your name, such as:
Or any other variations you prefer. But using your full name with subsequent numbers is usually the easiest to remember and communicate to others.
For the numbers, choose something memorable for you. It can be a birthday, zip code, address, or lucky numbers. Random numbers can be hard to remember, and a string of successive numbers (like 1234567) will be easy to fudge when typing.
3. Once you create a unique username, create a strong password. Choose something with uppercase letters, lowercase letters, special characters (not letters but symbols like @, !,(,), or ?) and numbers.
Write down your new username and password on a piece of paper, and keep it in a safe place.
4. The next page will ask for the following information:
- Phone number (optional)
- Recovery email (optional)
- Birthday
- Gender
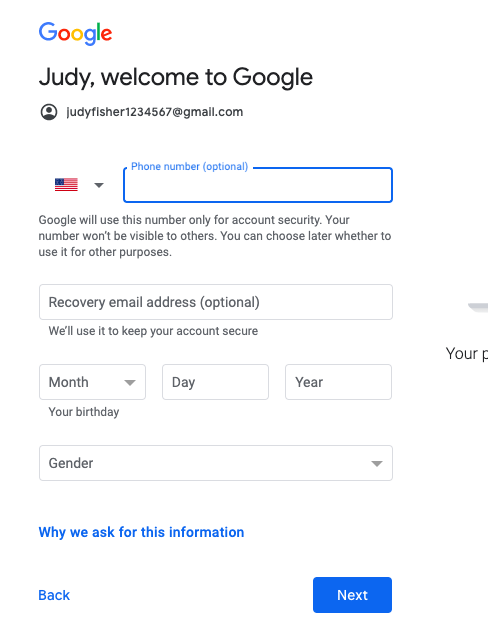
The recovery email and phone number can help you access your account if you lose your password. While these are technically optional, adding a phone number can help you get into your account if you forget your password.
5. The next page asks you to agree to privacy policies and terms of service for Gmail and Google. It concerns how the company uses your data to create advertisements.
There is no need to worry about the use of your data, as it’s common in today’s online world and will likely only result in advertisements tailored for you. If you choose not to allow access to your data, you can opt out of creating an account or increase privacy settings later on.
Once you agree to the terms, you’ve created your Gmail account and will have access to your inbox.
Using Gmail
Now that you have a new Gmail account, let’s discuss how to log in and use it.
Signing In
Depending on your search engine settings and access to the internet, your Gmail account will likely stay logged in. All you need to do is go to gmail.com, and you can access your inbox.
If you need to sign in to your account, go to gmail.com and enter your username and password into the specified fields. I recommend adding Gmail to your bookmarks, so you can head to your inbox with one click.
Composing and Sending Emails
Gmail makes it easy to send emails. When you’re ready to create a new email and send it out, follow the steps below.
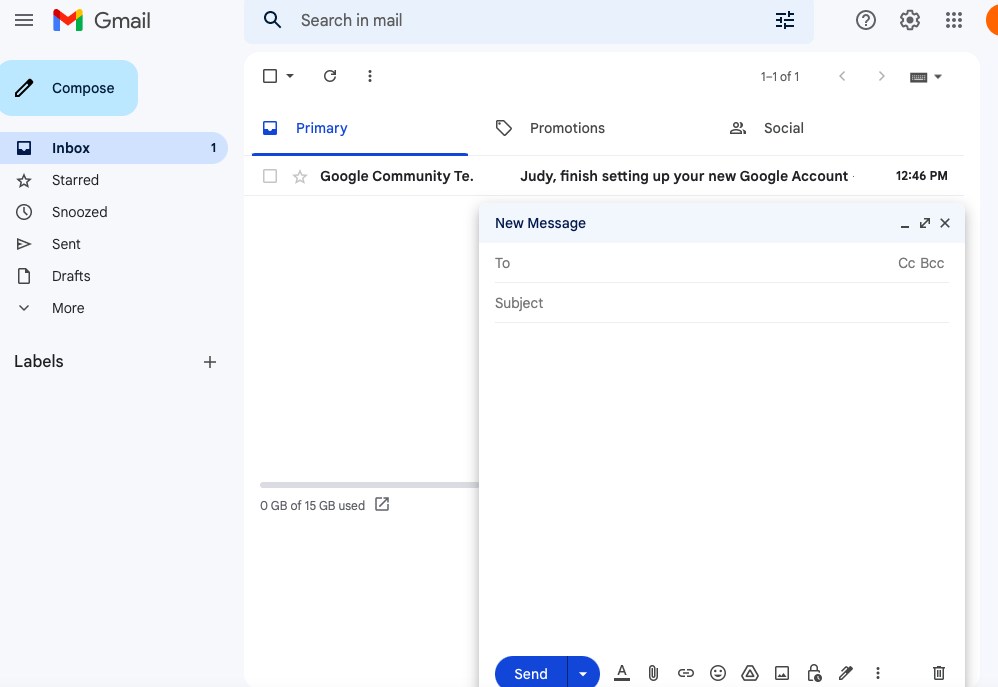
1. In the upper left corner of your inbox, there is a large rectangular button labeled “Compose” with a small symbol of a pencil. Click on this to begin a new email.
2. A new message window will open on the lower right side of the page. If you want to expand this message window, press the double-sided arrow in the right-hand corner of the message box. The line to the left of the arrow will minimize the message, so you cannot see it. The X beside the arrow will delete the message.
3. In the top field of the message window, type the email address of the person(s) you want to send the message. In the field below, type the subject of your message. In the larger field below the subject, you can type your message.
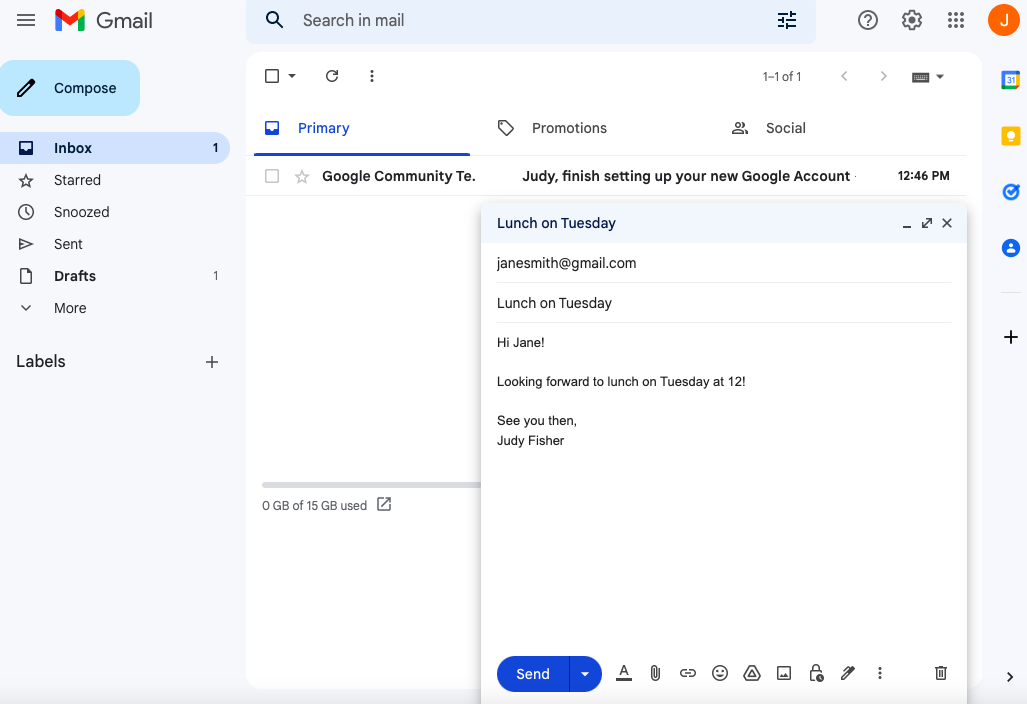
4. Once all the information is in the message, click the blue send button in the bottom left corner of the message window. When you press send, a small dark gray box will say the message is sending, and then confirm when the message is sent.
Opening and Responding to Emails
When someone emails you, opening the message and responding is also easy. Follow the steps below to access an email and send a reply.
1. Your inbox will display messages and their subject line as a list in your inbox. Unread messages will be bolded. Open the message you want to read by clicking on the line.
2. Once it opens, you can scroll up and down to read the email, finding important information, like who it is from and when it was sent at the top of the page.
3. After you read it and want to respond, you have two options. At the top of the email, there is an arrow pointing left beside the email’s information. You can click on this. Another reply button is at the bottom of the email, which has the same arrow and says “Reply”.
4. When you click one of the reply buttons, a new message box will open addresses to the sender, creating a message thread. A message thread shows a series of messages sent back and forth under the same subject.
5. Type your response, press the blue send button, and your message will send to the person who sent the previous email.
Deleting Emails
If you want to keep your inbox clean and organized, it can help to delete emails and conversations once you no longer need them. For example, after Judy and Jane have lunch, they likely don’t need to save the email conversation.
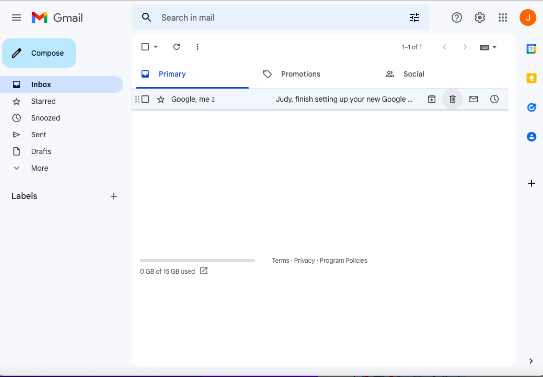
1. To delete an email, hover your mouse over the email line in your inbox. A tiny trash can will appear beside the email subject line.
2. Click on the trash can icon.
3. A gray box toward the bottom of the screen will appear, confirming you deleted the conversation.
Recovering Deleted Emails
So where do these deleted messages go? What if you accidentally delete an email? Don’t worry! Recovering a deleted email is easy.
1. On the left side of your inbox, there is a list of categories, in this order:
- Inbox
- Starred
- Snoozed
- Sent
- Drafts
- More
Click on “More,” to look at the other folder options.
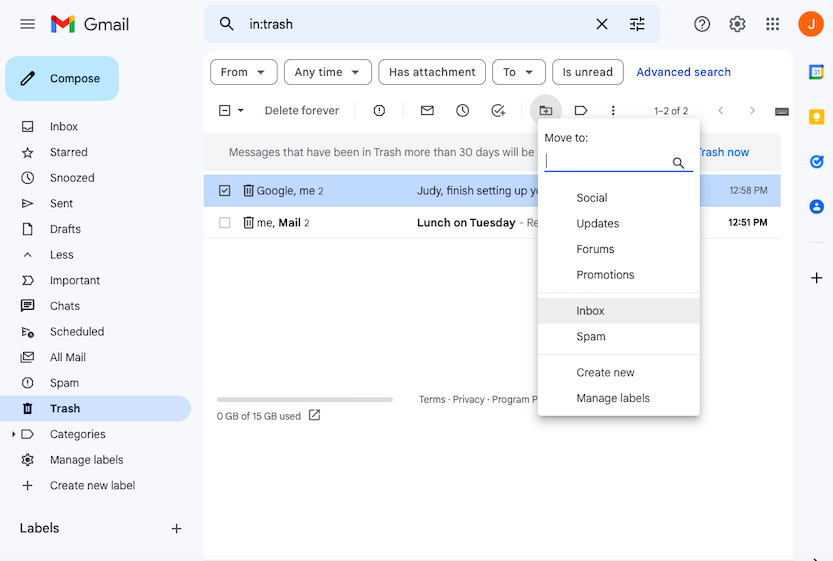
2. From the new folders displayed, click on the one labeled “Trash,” with the same tiny trash can icon. Deleted messages stay in your trash for a designated time before being deleted permanently.
3. Check the box on the email you want to save. Once you check this box, a row of icons appears at the top.
4. Choose the image of a filing folder with an arrow. When you click on it, a dropdown menu of email folders will appear. Select where you want to move the email. In this case, you want to move the email back to your inbox.
Understanding Folders
Let’s talk about email folders! They help you keep your inbox clear and emails organized. Learn about the different folders and their meanings below.
Inbox: The top folder is your inbox, where you can view all incoming mail, including “read” and “unread” messages.
Starred: Every email line has a star on the left side. When you star emails, they end up in the starred email folder. This is a great way to keep track of important messages, such as travel dates or tickets.
Snoozed: If you receive an email you want to handle later, you can snooze it for the desired length of time. It will move to the snoozed folder and return to your inbox when the snoozed time is over.
Sent: This folder contains all outgoing messages, meaning ones you’ve sent to others.
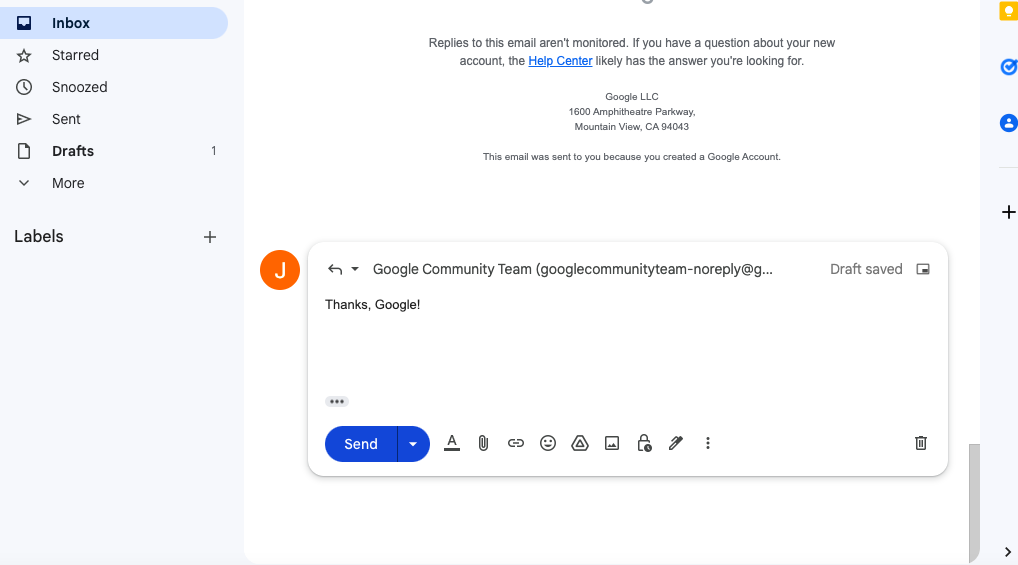
Drafts: This folder has all messages you began to type but never sent. Gmail saves all unsent messages to drafts automatically.
Important: Gmail uses an algorithm to determine what emails and email addresses are important to you. Emails Gmail deems important go to the important folder, but you can adjust this manually.
Chats: The Chats folder keeps any instant message chains you create. However, this feature is not widely used.
Scheduled: Gmail allows you to compose emails and schedule a time to send them. You can type an email at midnight and set it to automatically send at 8 am. Any scheduled emails waiting to be sent sit in the Scheduled folder.
All Mail: This folder combines everything including spam, trash, sent, received, and any other email labels.
Spam: Your spam folder is emails Gmail directs away from your inbox. They are often unwanted promotional emails, and Gmail judges what is and isn’t spam based on sender data and your email habits.
Trash: We explained the Trash folder earlier! It contains any emails you deleted. The Trash folder holds deleted emails for a default of 30 days and then deletes them permanently.
Email Line Actions
When you hover over an email from your inbox, a few options appear beside the subject line. We discussed the trash can icon, but what about the others? Moving left to right, this section will tell you what each button can do.
Check Box: Every email has a box you can check and uncheck. Checking and unchecking emails allows you to move batches of emails to folders at once, saving you time and clicks.
Star: Next is the star. When you click an empty star, it will fill in yellow and move to the Starred email folder. You can do this with emails you want to save or refer to later.
Following the star are the sender’s name and other addresses in the email thread. A few spaces away from the sender is the beginning of the subject line, followed by a glimpse at the email if the subject wasn’t too long. When not hovering over the email, it will show the email timestamp at the end of the line.
But when you do hover, it will reveal:
Archive: The tiny cube with the downward arrow is first. This button archives messages. This function removes the email from your inbox and active folders, archiving it. The message isn’t deleted but saved in your archives.
Trash: You already know the trash button deletes emails!
Read/Unread: The small envelope icon may be a closed envelope or an open envelope. This symbol indicates whether the email has been read/opened or not. If you want to change the status, you can click on the envelope, and it will open or close accordingly.
Snooze: The last symbol on the email line is a clock icon. This feature lets you snooze certain emails. When you click the clock icon, it will display a dropdown menu with suggested times to snooze the email until. You can also customize the snooze time down to the minute.
Searching Emails
The last basic of Gmail is using the search bar to find specific emails. At the top of every Gmail page is a search bar you can use to find an old or lost email.
Try to type words you know were in the email or subject line. You can also search emails between you and specific email addresses to find all of your conversations with another person.
For example, if Judy wanted to find the email she sent to Jane, she could enter “Lunch” or “Tuesday” or “[email protected]” into the search bar. There are other ways to filter your search, but it can get quite complicated.
Helpful Tips and Tricks
Now that you know Gmail basics, let’s make you a pro! Once you get comfortable with your inbox and emails, you can fiddle around with the more innovative functions of Gmail.
Below are a few tips, tricks, and appealing features you may want to try!
Inbox Customization
While the default Gmail setup is fine, you can customize practically everything. There is a gear symbol in the upper right-hand corner of your inbox.
This icon opens your settings panel, where you can change the flow of your inbox, the theme, the density, how reading panes open, and more.
You can change the font or text color you use in emails, enable or disable spelling and grammar assistance, customize shortcuts, change star colors, and more.
For example, if the screen is too bright and hurts your eyes, you can choose more muted colors that are easier to look at for extended periods of time.
Create a Signature
If you want to sign off every email with the same information, such as your name, phone number, email, or office, you can automatically set this as your “signature.”
Under general settings, scroll down most of the page until you find the Signature section. Click “Create new” and type in what you want to appear at the end of every email. Some people keep it simple and use their name while others add inspirational quotes!
Search Filters
As mentioned above, you can filter your search. In the search bar, there is a slider icon indicating filter options.
When you click on this, you can search for emails from a specific time, of a certain size, with or without attachments, and other specifications to help you find the email you need.
For example, if your grandson sent you an email with a digital train ticket, you could search for his email address and filter out any that don’t have attachments, making it easy to find.
Reporting and Blocking
Let’s learn how to block email addresses or report emails.
1. To report an email or sender, or block a sender, open the email.
2. At the top of the email, below the subject line but above the message you will see three dots. The three dots are on the right beside the reply arrow. Click the three dots to display the dropdown menu.
3. This button gives you many options, so it can be a little overwhelming. You want to focus on three options in the middle:
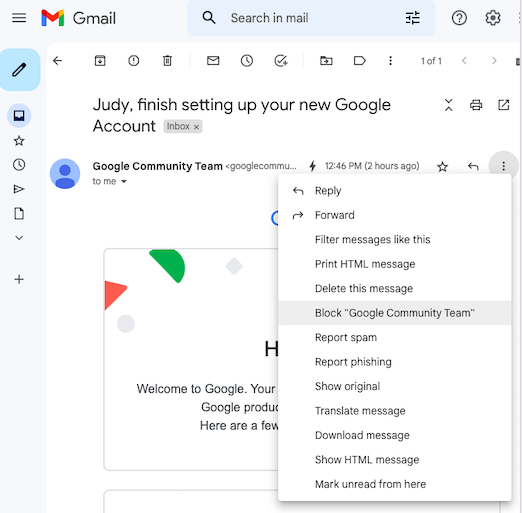
- Block “Sender’s name” (here, the sender is “Google Community Team”)
- Report spam
- Report phishing
Phishing is when an email tries to get you to open a link to infect your computer with a virus. Luckily, Gmail’s advanced security algorithm has helped weed these out, so most Gmail users don’t need to worry about phishing scams! It makes Gmail one of the safest emails you could use.
But the other two options can be helpful. If you receive unwanted emails from a company, you can report them as spam, and they won’t enter your inbox anymore. The block option means this sender can never email you again.
Is Gmail Safe?
Gmail uses world-class security. They monitor things like suspicious logins, unauthorized activity, fraudulent accounts, and phishing scams to keep you and your data protected.
While Gmail is not the most secure email service of all, no service is 100% safe from hackers. Gmail takes many steps to ensure your email and identity are safe, and you can do the same by reporting phishing scams and only communicating with emails you know.
Benefits of Gmail for Seniors
For seniors who think they don’t need an email, a few reasons may change your mind! Below are the top benefits of email for seniors.
Centralized Communication
The immediacy of texts or calls can be overwhelming and inconvenient. A Gmail account allows people to communicate more casually, so family message threads allow seniors to stay in touch with everyone using comfortable technology.
Promotions and Deals
While some emails may be spam, having an email can make it easier to access promotions and coupons from your favorite companies and brands. Seniors can easily save coupons from their favorite companies to save money and take advantage of impressive deals!
Easy Content Sharing
Sending photos, videos, links, and other complex content can be difficult via text. But emails make it easier to send this content and view it. Watching a video on a phone can be uncomfortable, but seniors can access videos and photos from their email on a phone, desktop, or tablet!
Gmail Alternatives
If something about Gmail does not appeal to you and your email needs, there are some other email services you can use for free. The top three alternatives to Gmail you can explore are:
- Outlook
- Yahoo Email
- Hotmail
The best email for seniors is one that is simple and intuitive. The three email services above, while reasonably popular still, are not as straightforward as Gmail.
One of the top benefits of Gmail for seniors is the Google prompts that can guide you through Gmail and explain new features in simple terms.
For personal use, Gmail is likely the best email service. It allows you to keep things plain, or dive into the myriad of features if you want to get fancier with your emails and inbox.
Wrap Up
No matter what you plan to use your email for, Gmail for seniors is the best choice. Every step is easy, from setting up to sending.
The beauty of Gmail is you can keep it simple, sending and receiving emails, or get more creative with the additional features like creating labels, folders, and a customized inbox.
Finding the best email for seniors can seem tough, but Gmail is an intuitive service you can understand in just a day!


